Configure the company details
Configure the company details
InventoryPlus's options can be customized by using the "Settings" toolbar menu. Setting window contains several Tab. The different features of a company can be selected or modified by using tab.
General
This tab displays the Opened company file Details. You can view opened company location,size,created date,Last Modified date, Last Backup Date etc,.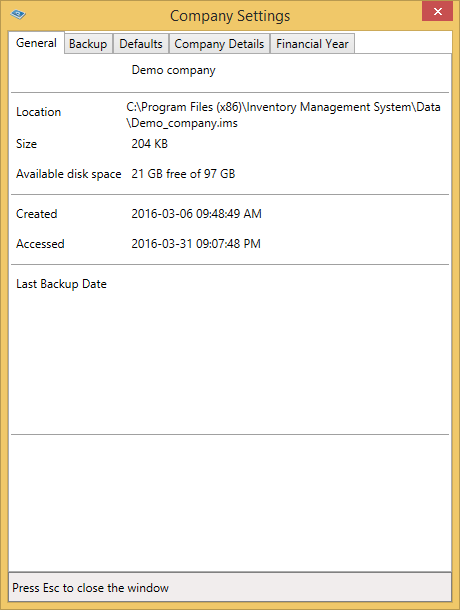
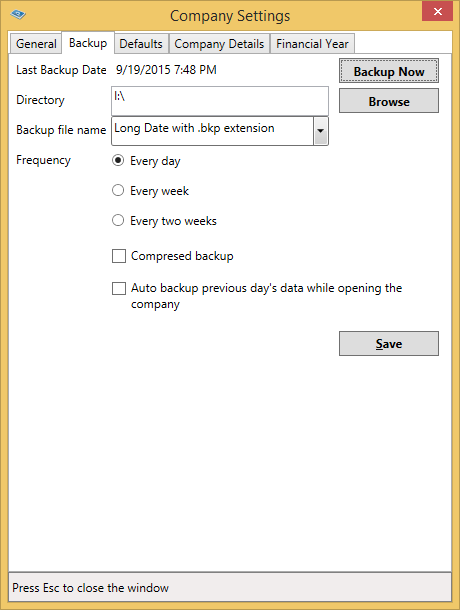
Backup
Backup Settings tab can activate it by clicking on Backup Tab. InventoryPlus has a flexible back-up mechanism wherein you can take a backup of the data from virtually any storage medium into any other medium. The more commonly used media are hard disk drive, zip drive, tape drive, etc. In the backup screen, the source of the backup and the destination of where it has to be stored has to be given, InventoryPlus will do as required.
Depending on the volume of data entry, an appropriate backup mechanism will have to be devised. One method to achieve the same will be by maintaining a backup directory in the local hard disk or the server (external storage media such as the floppy disk, zip diskette can also be used). We can have sub-directories for every day of the week under the main backup directory and regularly take data backups in the following manner depending on the day of the week.
Monday – C:\CAPBackup\Monday
Tuesday - C:\CAPBackup\Tuesday
Wednesday- C:\CAPBackup\Wednesday and so on till Saturday.
Note: In the example, we have given the I drive path- this does NOT mean that the Value backup facility is limited to the Hard Disk drive alone. The above procedure ensures that there exists a reliable data backup at any given time. In order to use that reliable data backup or bring back the data from that existing data backup, we have to use the "Restore" option.
Add.fields
Add.fields tab can be activated by clicking on Add.fields tab. It helps to add the extra fields in customer details, suppliers, products, purchase, sales, workorder and company details.
Defaults
Default setting tab can be activated by clicking on Default tab. All general configuration related to company's default settings will be available here.
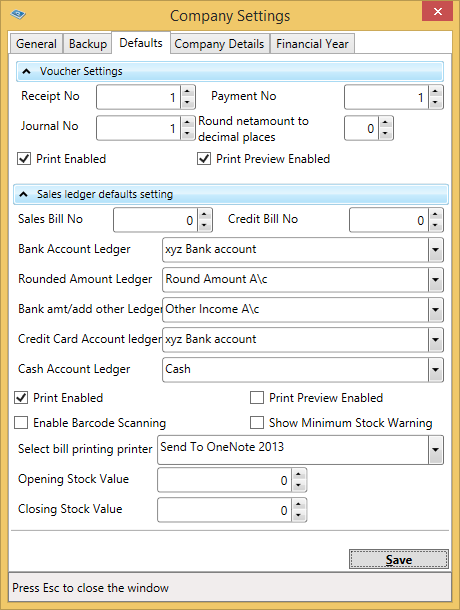
- Voucher settings:- Enter the Starting Voucher No of company whose books are being opened. Enter stock journal and stock verification number and also enable print and print preview.
- Sales defaults settings:- Enter Starting Sales Bill no, Credit Bill no. Select Bank Account, Credit Card account Ledger. Select Rounded Amount Ledger used in Sales bill to Round the Net amount. select printer for printing the invoice. and some option to enable allow nill stock, enable edit product name during sales, enable minimum stock warning, enable update product rates on save, enable print and print preview, enable barcode scanning and enable the rounded amount.
- Invoice template gallery:- There are some invoice template for printing invoice, select the invoice template and save.
- Brokerage default settings:- InventoryPlus simplify the commission calculate based on sales using Brokerage module. System supports various configuration to calculate the brokerage with different parameters.
- Work order setting:- Enable work order, track consumption and track production. if needed change the work order and estimation label.
- General settings:- Enter opening stock value when the company starts and enter closing stock value when closing of financial year. select purchase and purchase return ledger, select sales and sales return ledger, select cash account ledger for tracking the ledger balances of all activity. Here some options to enable barcode scanning in purchase, multiple branches, coupon, stock journal and stock verification, brokerage, MRP, QR scanning, material movement register, multiple location stock handling and Audit trial.
Note :
- Selecting 'Print Enable' option enabled Printing in the Sales/Voucher Transactions.
- Selecting 'Print Preview Enable' option enabled Print preview the Sales/Voucher Transactions. Disable the option suppose if you want to send to printer without preview(Increase the billing speed).
- Make sure to create the ledger using accounting screen before selecting the list.
- Create the Bank Account Ledger selecting the "Bank Accounts"(Under drop-down) in accounting screen.
- Creating the Income/Expense Ledger in accounting screen enables you to selecting in 'Rounded amount ledger' and 'Add other' selection control.
- Select the bill printing printer, Selection will be available for all installed printer. Sales bill will sent to the selected printer.
- Enable Barcode Scanning option enable to barcode scanning system in InventoryPlus. Barcode details should be entered in 'Products details' screen for each item. Refer theProduct details topic
Company Details
Company details can be activated by clicking on Company detail tab. This screen used to configure the company details.
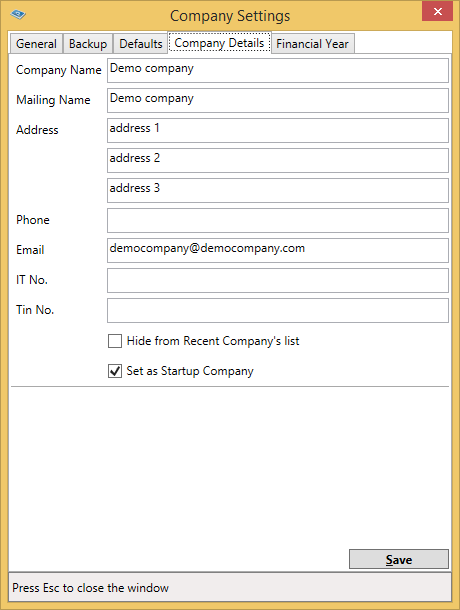
Give the name of the company whose books are being opened. The name given here will typically be the name of your company. If you are a professional accountant and are maintaining the books of your clients, give the Client Company's name. In addition to the Company Name - InventoryPlus provides the facility to enter the mailing name and address of the company.
Note:
- Selecting the 'Set as startup Company' option enables load the current company file as default opening Company. If you want to open the company, you should use the open tool bar menu or just double clicking the company file name located in recent companies..
- Selecting the 'Hide in Startup page' option hide the company file name in startup page list. Using this option you can hide the
company from other users.
Financial Year
Financial year configuration and new financial year creation can be done using this screen.
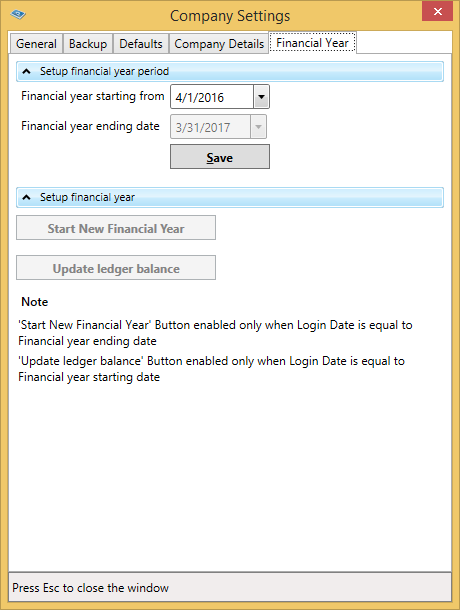
Company book is maintained for a stipulated period like, 12 months. This stipulated period is referred to as the Financial Year. Therefore - specify the required Financial Year date - for the company being created. The stipulated period of the financial year is 12 months in most countries. Hence, InventoryPlus automatically considers 12 months from the date you give here as the Financial Year. Select "Financial year starting from" date to mention the financial year starting date. System will automatically calculate the financial ending date. click on save button to Save the financial year starting and ending date.
'Start New financial Year' button is used to close current financial year and create new next financial. By clicking on Create new financial year button will take you to New Financial Year Wizard. 'Update ledger balance from previous financial year' button is used to update current year transaction OB with Previous year CB transaction. By pressing 'Update ledger balance' button will take you to Update Financial Year Wizard
Visit Manage Financial year topic for more about closing the financial year transaction and create new financial year file.
Note:
- 'Create New financial Year' button enabled/appears only Login Date is set to last date of Financial Year ( as per above screen shot i.e. 31-Mar-2017).
- 'Update ledger balance' button enabled/appears only Login Date is changed to First date of Financial Year ( as per above screen shot i.e. 01-Apr-2016).
- System will create the new file for each financial year. Creation of new file is automated and all ledger balance and stock will be carry forwarded to new file. after creation of new financial year process inventoryplus will log off and log in with new file.
- If organization using the multiple company, system will create the one file for each company. Complete the year end process for each company is mandatory to continue to next financial year.