MultiCounter Remote Access
Multiple user/Remote/Multiple terminal installation instruction.
InventoryPlus supports multi-counter billing and remote access, allowing multiple client billing terminals (LAN or remote devices) to connect concurrently to a single central company database.
With the new Store Code pairing and Company Hub, configuring multiple counters no longer requires complex manual network path mapping or SMB file sharing.
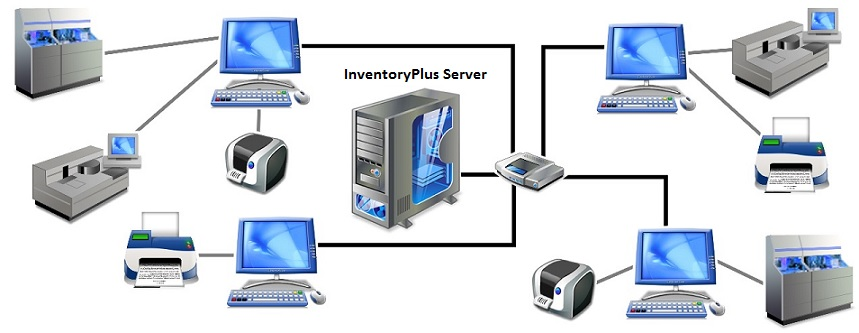
1. Server Setup: Activating Multi-Counter Server & Network Pairing
Perform these steps on the Main (Server) PC where your company database is stored:
- Open Company on Server:
- Launch InventoryPlus and open your active Company.
- Access Network Configuration Settings:
- Navigate to Settings →→ Company Details / General Settings (or the Multi-Counter Server & Network Pairing card).
- Enable Multi-Counter Server:
- Toggle the switch to Enabled.
- Verify that the Status changes to � Running.
- Note / Copy your Store Code:
- A unique Store Code (e.g., xxxxx-xxxxxx) will be generated.
- Click [� Copy Code]. You will use this code to connect client billing counters instantly without entering complicated network paths.
- Review Advanced / Network Configuration (Optional):
- Click Show Advanced / Network Configuration to view or configure:
- Server IP Address / Hostname: Select your network adapter/computer name (e.g., hostname static LAN IP 192.168.x.x).
- Port: Default is 9090 (Ensure this port is allowed in firewall).
- Windows Defender Firewall: A green indicator confirms Windows Defender Firewall Allowed. If not allowed, click the link/icon to authorize InventoryPlus.exe through the firewall automatically.
- Prevent system sleep while server is running (recommended): Keep this checked so client terminals are not disconnected due to power savings.
- Prompt to approve new incoming client connections: Enable if you want the server operator to manually authorize new counters connecting for the first time.
- Custom Cloud Provider Setup (Self-Hosted / BYOC): Available for self-hosted cloud relay/tunnel setups when connecting across disparate public networks.
2. Client Setup: Connecting Remote Terminals via Company Hub
Perform these steps on each Client Billing Counter / Remote PC:
- Launch InventoryPlus:
- Open InventoryPlus on the client terminal. The Company Hub — Select or Connect to Company screen will appear.
- Connect via Store Code (Recommended - Instant Access):
- Under the ⚡ Quick Actions sidebar on the left:
- Locate the Connect via Store Code box.
- Enter the 12-digit Store Code generated from the Server (e.g., 822025-686894).
- Click [Connect].
- InventoryPlus will automatically establish a secure connection over LAN or Remote Access, fetch the company details, and open the database.
3. Alternative Client Connection Methods in Company Hub
If connecting without a Store Code:
- Scan LAN / Discovery:
- Click Scan LAN / Discovery on the left menu. InventoryPlus will search your local network for active InventoryPlus servers and display them in the list.
- Manual Server IP & Port:
- Expand Manual Server IP & Port at the bottom left.
- Enter the Server IP (e.g., 192.168.1.100 or Server PC name) and Port (9090).
- Click Connect.
- Opening from Recent & Available Companies:
- Once paired, the company appears under the Recent & Available Companies list.
- Click [Select / Open] on the company card to launch billing immediately.
4. Best Practices & Troubleshooting
- Server Must Stay Running: The Server PC and InventoryPlus must remain powered on and running while billing counters are active.
- License & Counters Limit: Check the counter badge on the Server card (� X Counters) to see how many concurrent terminals are connected. Ensure your subscription plan covers the required number of multi-counters.
- Firewall / Port Permissions:
- Ensure TCP Port 9090 (and 9091) is inbound/outbound enabled on the Server PC firewall.
- In Company Hub, click Network Diagnostics or Expand Network Diagnostics & Troubleshooting Report to run automated connectivity checks between the client and server.
Refer this video how to enable network configuration if your network not allowed to connect to server with above configuration.
Refer this video for Network Configurations
Refer this video for how to open the PORT
Server Static IP Configuration
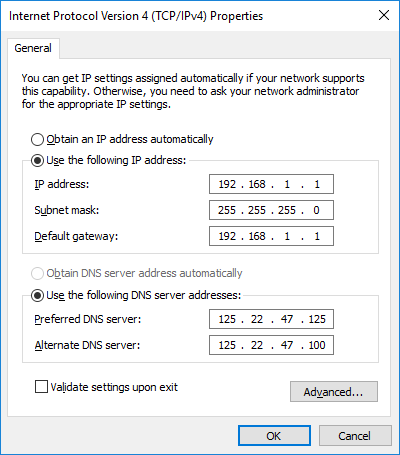
- Required to change the server ip address to Static IP.
- Click Change adapter settings. Right-click on Local Area Connection and click on Properties. Select Internet Protocol Version 4 (TCP/IPv4) and click on Properties. Select "Use the following IP address" and enter the IP address (Ex. 192.168.1.1), Subnet Mask, Default Gateway. and DNS server. Below screen is for reference only, Use any IP address or use the IP and other setting recommended by router.
Proxy Configuration on Server.
- Goto window Control panel
- Goto Windows Defender Firewall
- Click on "Allow an app or feature through Windows Defender Firewall" link
- Click on Change Settings
- Click on "Add another app" button
- Click on Browse button and select the InventoryPlus.exe file located at installation location "C:\Program Files (x86)\InventoryPlus"
- Click on "Network Types.." button and select the Public option.
- Click on Add button to Save the Settings.
- Additional to above settings, Add 9090 port to outbound and inbound of proxy settings.
InventoryPlus Installation and configuration steps to follow.
- Install InventoryPlus on server system - Run the setup file on server system to install the software.
- Install InventoryPlus on client system - Run the setup file on client system to install the software.
- Create the new company on server system, when creating the new company .ims file will be created on data folder found at InventoryPlus installation location. While installing software shared folder will be created with "InventoryPlusData".
- Enable the server as mentioned in step 1
- Goto Files -> Open -> Company hub then enter store code and click on connect. Select the company you want to open. Refer the step 2 how to connect from client.
Note:
- Software upgrade on network is manual installation of setup file on all systems including server and all clients.
- All client system will connect to server using IP address/Server Host name, make sure use the static IP address on server system.
- InventoryPlus subscription activation required Server's IP and Port. If server IP is changed then required to change the Server IP address, Goto settings -> Company Data -> IP Address
- InventoryPlus should run always on server and open the activated company so all clients connected to server will be auto activated. No need to register the clients. Only server company activation is required.
- After opening the company from clients, Goto settings -> Company Data -> Select "Set as Startup Company" and click on Save, This will open the selected company when inventoryPlus starts always.
- Enable "Smart Client" option from settings -> Defaults -> General Settings. This will improve the performance of client system when database size exceeds more then 50MB then enable this feature.
- Confirm firewall is not blocking the port 9090 & 9091, Many antivirus like McAfee, Windows Defender etc built with default firewall, enable port in firewall else networking may not works.
FAQ
1. How to get the server IP address?
Answer : Get the server IP address is simple. Run the software on server, Load "Open from server" will display the pop-up with open company window with server path. Server path contains IP address, use the same IP address on all client system to connect. (usually IP Address start with 192.xxx.xxx.xxx).
2. How to enable the inbound and outbound port?
Answer: Refer youtube video for more details about how to enable the port. Always enable port for Inventoryplus.exe application only instead of open port for all application.
3. How to test all configurations are done correct and there is no issues in configuration.
Answer: Run the software on Server and Goto Settings -> General tab, You can see the message "InventoryPlus Server Started"